Volvo XC90: Wheels and tires / Recommended tire pressure
The tire pressure placard on the driver's side B pillar (between the front and the rear door) indicates tire pressure for different loads and speed conditions.
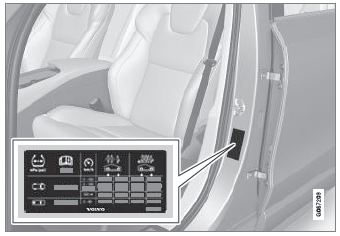
Location of the tire pressure placard
The decal specifies the designation for the factory- mounted tires on the vehicle, as well as load limits and inflation pressures.
NOTE
The decals shown in the Owner's Manual do not claim to be exact reproductions of those found in the vehicle. The purpose is to show approximately how they look and about where they are located on the vehicle. The information that applies for your vehicle in particular is found on the decal on the vehicle.
 Adjusting tire pressure
Tire pressure decreases over time, which is normal. The tire pressure must
therefore be adjusted to maintain the recommended tire pressure.
Use the recommended inflation pressure for cold tires to help maintain good tire
performance and even wear...
 Tire pressure monitoring system
(Option/accessory.)
The tire inflation pressure monitoring system6 provides an indicator symbol
in the instrument panel if pressure is too low in one or more tires...
Other information:
Volvo XC90 2015-2026 Owners Manual: Location of exterior lights
The vehicle's exterior lighting consists of several different bulbs. LED1 bulbs must be replaced by a workshop. An authorized Volvo workshop is recommended. Front bulbs (vehicles with halogen headlights) Low beams High beams Daytime running light/parking light Turn signal Front fog light/cornering illumination* (LED) Rear bulbs Brake light (LED) Parking light (LED) Backup light2 Parki..
Volvo XC90 2015-2026 Owners Manual: Removing the plastic cover to replace bulbs
The headlight bulbs can be replaced without the assistance of a workshop, but before a bulb can be replaced, the plastic cover over the headlight needs to be removed. Lift the rubber strip by pressing it inward into the engine compartment. Release the pins in the plastic cover's four clips by pressing them down with a screwdriver or similar object and remove the covering. Put the cover ba..
- Manuals Home
- 2nd Generation XC90 Owners Manual
- 2nd Generation XC90 Service Manual
- Indicator and warning symbols
- Connecting the vehicle to the Internet via vehicle modem (SIM card)
- Leveling control settings
- New on site
- Most important about car
Categories
Driver/passenger side front airbags
As a supplement to the seat belts, the vehicle is equipped with driver and passenger side front airbags.
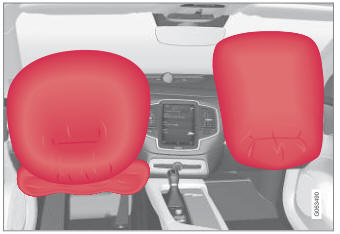
Driver/passenger side front airbags.