Volvo XC90: Wheels and tires / Using the tire sealing system
The temporary tire sealing system (TMK1) can be used to seal a puncture in a tire. Read through all instructions before use.
Overview
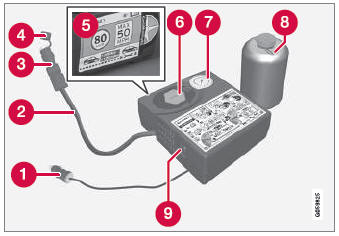
 Electrical cable
 Hose
Hose
 Air release valve
 Protective hose cover
 Speed limit sticker
 Bottle holder (orange cover)
 Air pressure gauge
 Sealing compound bottle
 Switch
Connecting
NOTE
Do not break the seal of the bottle before use. The seal is broken automatically when the bottle is screwed into place.
WARNING
Please keep the following points in mind when using the tire sealing system:
- The sealing compound bottle (no. 8 in the illustration) contains 1) rubber latex, natural and 2) ethanediol. These substances are harmful if swallowed.
- The contents of this bottle may cause allergic skin reactions or otherwise be potentially harmful to the respiratory tract, the skin, the central nervous system, and the eyes.
Precautions:
- Keep out of reach of children.
- Do not ingest the contents.
- Avoid prolonged or repeated contact with the skin. Remove any clothing that has come into contact with sealant.
- Wash thoroughly after handling.
First aid:
- Skin: Wash affected areas of the skin with soap and water. Get medical attention if symptoms occur.
- Eyes: Flush with plenty of water for least 15 minutes, occasionally lifting the upper and lower eyelids. Get medical attention if symptoms occur.
- Inhalation: Move the exposed person to fresh air. If irritation persists, get medical attention.
- Ingestion: Do NOT induce vomiting unless directed to do so+ by medical personnel. Get medical attention.
- Disposal: Dispose of this material and its container at a hazardous or special waste collection point.
WARNING
Do not remove the bottle or the hose while the tire sealing system is being used.
- Preparations
Turn on the vehicle's hazard warning flashers if the tire sealing system is to be used in an area with traffic.
If the puncture was caused by a nail or similar object, do not remove it. It will help seal the hole.
- Peel off the speed limit sticker from the side of the compressor. Affix the decal to a clearly visible location on the windshield to remind the driver not to exceed this speed limit. Do not drive faster than 80 km/h (50 mph) while using a tire that has been temporarily repaired with the tire sealing system.
- Make sure the switch is in the 0 (Off) position and take out the electric cable and the hose.
- Unscrew the orange cover on the compressor and unscrew the cap on the sealing compound bottle.
- Screw the bottle onto the bottle holder as far as possible.
The bottle and the bottle holder are equipped with catches to help prevent the sealing compound from leaking. Once the bottle is screwed into place into the bottle holder, it cannot be unscrewed. The bottle can only be removed by a workshop2.
WARNING
Do not unscrew the bottle. It is equipped with a catch to prevent leakage.
- Unscrew the tire's valve cap and screw the hose's valve connector as far
as possible onto the valve.
Be sure the air release valve on the compressor's hose is completely closed.
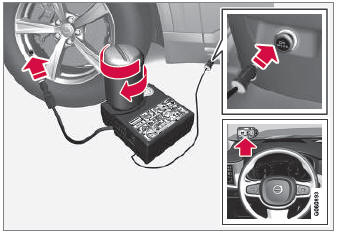
- Begin tire sealing procedure
Connect the electrical cable to the nearest 12 V outlet and start the vehicle.
NOTE
Make sure that none of the vehicle's other 12 V sockets are used while the compressor is running.
WARNING
Never leave children unattended in the vehicle while the engine is running.
WARNING
Inhaling exhaust fumes could lead to serious injury. Never leave the engine running in an enclosed space or a space without sufficient ventilation.
- Start the compressor by moving the switch to the I (On) position.
When the compressor starts, the pressure can increase up to 6 bar (88 psi), but the pressure will decrease after approx. 30 seconds.
WARNING
Never stand next to a tire being inflated with the compressor. If cracks, bulges, etc. form on the tire, switch off the compressor immediately. The vehicle should not be driven. Call roadside assistance to have the vehicle towed to a workshop for inspection/ replacement of the tire. Volvo recommends an authorized workshop.
- Inflate the tire for 7 minutes.
CAUTION
To help avoid overheating, the compressor should never be used for more than 10 minutes at a time.
- Switch off the compressor and check the inflation pressure using the air
pressure gauge. The inflation pressure should be between 1.8 bar (22 psi) and
3.5 bar (51 psi). If the inflation pressure is too high, use the air release
valve to release air.
WARNING
If pressure falls below 1.8 bar (22 psi), the hole in the tire may be too large. The vehicle should not be driven. Call roadside assistance to have the vehicle towed to a workshop for inspection/replacement of the tire. Volvo recommends an authorized workshop.
- Switch off the compressor and remove the electrical cable.
- Unscrew the hose from the tire's valve and screw the valve cap back on.
NOTE
- After inflating a tire, always replace the valve cap to help prevent valve damage caused by gravel, dirt, etc.
- Use plastic valve caps only. Metal caps could corrode and become difficult to remove.
- Put the protective hose cover onto the hose to help prevent leakage of any residual sealing compound. Return the equipment to the cargo compartment.
- Immediately drive the vehicle at least 3 km (2 miles) at a maximum speed
of 80 km/h (50 mph) to allow the sealing compound to seal the tire, and then
recheck the inflation pressure.
WARNING
During the tire's first revolution, some sealing compound may spray out of the puncture hole. Before driving away, make sure that no one is near the vehicle who could be sprayed with sealing compound. Make sure no one is within 2 meters (7 feet) of the vehicle.
- Rechecking the inflation pressure
Connect the hose to the tire's valve and screw the hose connector onto the valve as far as possible. The compressor must be switched off.
- Check the inflation pressure on the air pressure gauge.
- If the pressure is under 1.3 bar (19 psi), the tire is not sufficiently sealed. The vehicle should not be driven. Call roadside assistance to have the vehicle towed.
- If the inflation pressure is higher than 1.3 bar (19 psi), the tire must be inflated to the inflation pressure specified on the tire pressure decal on the driver's side door pillar (1 bar = 100 kPa = 14.5 psi). If the inflation pressure is too high, use the air release valve to release air.
WARNING
Check inflation pressure regularly.
Volvo recommends driving to the nearest authorized Volvo workshop to have the tire replaced/repaired. Inform the workshop that the tire contains sealing compound.
The sealing compound bottle and the hose must be replaced after use. Volvo recommends contacting an authorized Volvo workshop for replacement.
WARNING
After using the tire sealing system, the vehicle should not be driven farther than approximately 200 km (120 miles).
NOTE
The compressor is an electric device. Follow local regulations for disposal.
1 Temporary Mobility Kit
2 An authorized Volvo workshop is recommended.
 Tire sealing system
(Certain models only.)
The temporary tire sealing system can be used to seal a puncture in a tire
or to check and adjust the pressure in the tire.
Models equipped with a spare wheel1 do not have the tire sealing
system...
 Inflate tires with the compressor included in the tire sealing system
The vehicle's original tires can be inflated using the compressor in the tire
sealing system.
The compressor must be switched off. Make sure that the switch is in the
0 (Off) position and take out the electrical cable and the hose...
Other information:
Volvo XC90 2015-2026 Owners Manual: Changing waveband and radio station
Instructions for changing wavebands, waveband lists and radio stations in the selected list are provided here. Changing wavebands Swipe from App view on the center display and select the desired waveband (e.g. FM) or open the App menu in the instrument panel with the right-side steering wheel keypad and make your selection there...
Volvo XC90 2015-2026 Owners Manual: Cross Traffic Alert limitations
(* Option/accessory.) (Warning for crossing traffic when the vehicle is backing up.) The Cross Traffic Alert (CTA) function with auto brake may have limited functionality in certain situations. Auto-brake is active at speeds under 15 km/h (9.3 mph)...
- Manuals Home
- 2nd Generation XC90 Owners Manual
- 2nd Generation XC90 Service Manual
- Arming and disarming the alarm
- Eco drive mode
- Moving the second row seats forward/rearward
- New on site
- Most important about car
Categories
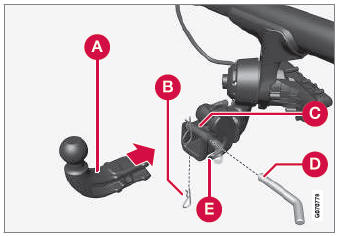
Detachable towbar
(Option/accessory.)
Volvo recommends the use of Volvo towbars that are specially designed for the vehicle.
NOTE
The optional detachable trailer hitch may not be available in all markets or on all models. Consult your Volvo retailer.