
Volvo XC90: Wheels and tires / Inflate tires with the compressor included in the tire sealing system
The vehicle's original tires can be inflated using the compressor in the tire sealing system.
- The compressor must be switched off. Make sure that the switch is in the 0 (Off) position and take out the electrical cable and the hose.
- Unscrew the tire's valve cap and screw the hose's valve connector as far
as possible onto the valve.
Be sure the air release valve on the compressor's hose is completely closed.
- Connect the electrical cable to the nearest 12 V outlet and start the vehicle.
WARNING
Inhaling exhaust fumes could lead to serious injury. Never leave the engine running in an enclosed space or a space without sufficient ventilation.
WARNING
Never leave children unattended in the vehicle while the engine is running.
- Start the compressor by moving the switch to the I (On) position.
CAUTION
Risk of overheating. The compressor should not be running for longer than 10 minutes at a time.
- Inflate the tire to the pressure specified on the tire pressure decal on the driver's side door pillar. If the inflation pressure is too high, use the air release valve to release air.
- Switch off the compressor. Remove the hose and the electrical cable.
- Screw the valve cap back onto the tire.
NOTE
- After inflating a tire, always replace the valve cap to help prevent valve damage caused by gravel, dirt, etc.
- Use plastic valve caps only. Metal caps could corrode and become difficult to remove.
NOTE
The compressor is an electric device. Follow local regulations for disposal.
 Using the tire sealing system
The temporary tire sealing system (TMK1) can be used to seal a
puncture in a tire. Read through all instructions before use.
Overview
Electrical cable
Hose
Air release valve
Protective hose cover
Speed limit sticker
Bottle holder (orange cover)
Air pressure gauge
Sealing compound bottle
Switch
Connecting
NOTE
Do not break the seal of the bottle before use...
 Determining the vehicle's permitted weight
Properly loading your vehicle will provide maximum return of vehicle design performance.
Weight designations
Before loading your vehicle, familiarize yourself with the following terms for
determining your vehicle's weight ratings, with or without a trailer, from the vehicle's
Federal/Canadian Motor Vehicle Safety Standards (FMVSS/ CMVSS) label, and the vehicle's
tire information placard:
Curb w..
Other information:
Volvo XC90 2015-2026 Owners Manual: Activating or deactivating Park Assist
(Option/accessory.) The Park Assist function (PAS1) can be activated or deactivated. Park Assist's front and side sensors are automatically activated when the engine is started. The rear sensors are activated if the vehicle is moving backward or reverse gear is engaged. Activate or deactivate the function using this button in the center display's Function view. GREEN button indicator light â..
Volvo XC90 2015-2026 Owners Manual: Jack
(Option/accessory.) The jack can be used to lift the vehicle to e.g. change a wheel. CAUTION When not in use, the jack* should be kept in its storage compartment under the cargo compartment floor. The jack provided with your vehicle is intended to be used only in temporary situations such as changing wheels in the event of a flat tire. Only the jack that came with your particular model s..
- Manuals Home
- 2nd Generation XC90 Owners Manual
- 2nd Generation XC90 Service Manual
- Active high beam
- Arming and disarming the alarm
- Drive modes
- New on site
- Most important about car
Categories
Connecting equipment to the vehicle's data link connector
Incorrectly connected or installed software or diagnostic tools may have an adverse effect on the vehicle's electronics.
We strongly recommend that Volvo owners use only genuine, Volvo-approved accessories, and that accessory installations be performed only by a trained and qualified Volvo service technician. Certain accessories only work when the associated software is installed in the vehicle's computer system.
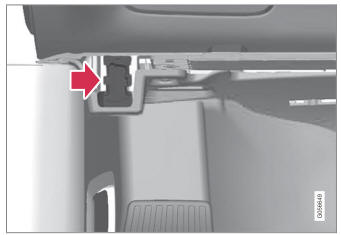
On-board Diagnostic (OBDII) socket under the dashboard on the driver's side.
